IAN WICENSKI
My process of learning simulation and animating with physics in Houdini.
1A
Project Setup
Throughout this project it was important for me to strictly follow specific file and folder organization protocol.
What's The Goal?
To create an appealing shot of a car kicking up mud using Houdini as an animation and simulation tool.
01
Project Setup, model import, initial shading
Before even working in Houdini, the first step was to pick what kind of car I wanted to rig and animate. The 1965 Ford Mustang, found here on Wire Wheels Club, was my favorite option.
Why did I pick this car?
The body of the Ford Mustang had a rugged look that the other cars didn't quite share. Knowing that this project was going to focus heavily on mud simulation, this car is a great option to put on the backdrop of dirt, mud, and nature.

Keeping my things in order was an important practice during this whole project.
Throughout this project it was important for me to strictly follow specific file and folder organization. I learned that careful file organization is a key component in building a functional Houdini animation.
Screenshot/recording of folder structure, example of file naming convention(s)
1B
Importing & Shading Assets
1C
Shading & Turntables
Since I already had the HRDI I would be working with, I recorded two turntables, one to showcase the vehicle's textures at different angles and the other to showcase the HDRI's lighting at different angles.
Purple areas on the model represent untextured surfaces. Take a look at the before and after linking the texture files.

Untextured

Textures applied
1C: Turntables

Turntable of prepped car asset

Turntable of HDRI
02
Exploring Variants

This was my first time using variants in Houdini and it was really interesting! Being able to easily select other versions of an asset can make it so easy to build a scene with variety.
In this screen recording I've got the variants I designed for both lighting and material variety.
Screenshot gallery of each variant that viewer can click through, video of variants which is already in!
03
Rigging and Animating
Here's a playblast of my car's animation path.

Screen recording of rig responding to controls/sliders, screenshot/recording of me changing the car's simluated parameters, screen recording(s) of car being animated using simulation.
04
Simulations and Basic Layout
Images of layout setup and layout, setting up sim path specific to car path, playblast of mud sim which is in already!
It was important to design the scene layout to fit closely around the animation path. This saves the computer extra work and keeps final render times realistic.
(this could be put into next section)

Playblast of mud simluation reacting to the car animation.

05
Finalizing the Layout, Lighting, and Shading
INTRODUCTION TO
SIMULATION IN HOUDINI
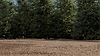
Adding trees, refining the ground, adding final HDRI and textures to everything
06
Rendering and Image Finishing
Completing the final render took about 12 hours.
After rendering my final image sequence I brought it into NUKE to do some final compositing.
Explanation of learning to render, screenshot of how I set up my render, NUKE compositing.
07
Final Animation

07.
FINAL RESULT & MOCKUPS
Describe section here!